Noisy engine
Printed From: guzziriders.org - moto guzzi forum
Category: Technical
Forum Name: Loop Frames
Forum Description: Anything about the original Guzzi V Twin.
URL: http://www.guzziriders.org/forum_posts.asp?TID=15885
Printed Date: 27 Mar 2026 at 04:23
Software Version: Web Wiz Forums 12.03 - http://www.webwizforums.com
Topic: Noisy engine
Posted By: el__burro
Subject: Noisy engine
Date Posted: 18 Jun 2025 at 18:27
|
Good afternoon, I am experiencing a very noisy engine. Mainly when warm and under stress. The clunking noise coming from the engine is not valve gap related. I have checked that many times. Here is a short video. https://youtu.be/Qk7rHJkB1Dw" rel="nofollow - https://youtu.be/Qk7rHJkB1Dw Any suggestions? Thanks el__burro ------------- el__burro |
Replies:
Posted By: ranton_rambler
Date Posted: 18 Jun 2025 at 19:32
| Big end? You can get the caps off and look at the shells and crankpin once the sump is off. |
Posted By: Chris950s
Date Posted: 19 Jun 2025 at 11:24
|
It could be big ends, has the engine been leaking oil? ------------- Chris and Karen - Essex 2011 Stelvio NTX, 1974 950S (750S replica nearly rebuilt!), 1966 Triumph T100SS 59 years young this year! |
Posted By: Brian UK
Date Posted: 19 Jun 2025 at 14:57
|
Sure it's not pre-detonation, knocking? ------------- Brian. Better 5 minutes late in this world than years early in the next. |
Posted By: Dave P.
Date Posted: 20 Jun 2025 at 11:38
|
So difficult to tell from a video. Could be a loose valve guide or small end/big end bearings. You're going to have to get on there and have a look. You appear to have only two warning lights, is one of them oil pressure and does it go out when you start the engine? ------------- TO LIVE OUTSIDE THE LAW YOU MUST BE HONEST. 1971 V7 Special. 1972 850GT. 1970 T120 Bonnie. 2009 500 Bullet. |
Posted By: Mike H
Date Posted: 20 Jun 2025 at 18:46
|
The red light does go out, but could be for battery charging. (?) ------------- "Chicken nuggets don't dance on a Tuesday." |
Posted By: Dave P.
Date Posted: 21 Jun 2025 at 05:40
|
It could indeed. I'd be looking to do an oil pressure check. ------------- TO LIVE OUTSIDE THE LAW YOU MUST BE HONEST. 1971 V7 Special. 1972 850GT. 1970 T120 Bonnie. 2009 500 Bullet. |
Posted By: el__burro
Date Posted: 21 Jun 2025 at 09:40
|
Thank you all for your replies and sorry for nor responding sooner. The 2 lights on my dash are GEN and N. I check oil level regularly and that is at level. Yes, the engine has oil on it but i cannot see any on the floor though. Would I tackle this from the top (remove cylinders) or bottom (remove sump)? Is there a good mechanic in London I could take the bike to? Thanks el__burro ------------- el__burro |
Posted By: Chris950s
Date Posted: 21 Jun 2025 at 09:42
There is Baldrick in SW London, a very fine chap  ------------- Chris and Karen - Essex 2011 Stelvio NTX, 1974 950S (750S replica nearly rebuilt!), 1966 Triumph T100SS 59 years young this year! |
Posted By: Mike H
Date Posted: 21 Jun 2025 at 17:21
 . ------------- "Chicken nuggets don't dance on a Tuesday." |
Posted By: el__burro
Date Posted: 13 Jul 2025 at 14:22
|
How difficult could this job be? I have no ramp. Thanks el__burro ------------- el__burro |
Posted By: Dave P.
Date Posted: 13 Jul 2025 at 16:21
|
Have you decided where to look first? You don't actually need a ramp, everything can be tackled with the bike on the floor. A bike lift of some sort is very nice to have but it's not a necessity. Make sure you have a kneeling pad!! ------------- TO LIVE OUTSIDE THE LAW YOU MUST BE HONEST. 1971 V7 Special. 1972 850GT. 1970 T120 Bonnie. 2009 500 Bullet. |
Posted By: ranton_rambler
Date Posted: 13 Jul 2025 at 17:37
| If you’re wanting to drop the sump and look at the big ends it will be do-able without a lift, but you’ll be lying on the floor I think. |
Posted By: Mike H
Date Posted: 13 Jul 2025 at 18:52
|
Yes this is certainly do-able. Actually should be able to take everything out leaving just crankshaft behind, with crankcase still in the frame. With sump off it should be possible to pull and push the big ends, in theory. ------------- "Chicken nuggets don't dance on a Tuesday." |
Posted By: Guzzished
Date Posted: 13 Jul 2025 at 23:37
Many Many long years ago my brother came to the conclusion that his BSA Lightening had duff crank bearings and stripped the engine completely to later discover it was actually his back mudguard rattling at a certain rev/resonance.  OUCH!!! OUCH!!! |
Posted By: el__burro
Date Posted: 14 Jul 2025 at 18:48
|
Thank you very much for your replies. I have decided to undertake the job.. eventually I will create a post on here for support. Thank you el..burro ------------- el__burro |
Posted By: Chris950s
Date Posted: 15 Jul 2025 at 09:00
It is possible, I have replaced big end shells without removing the engine, I did remove the cylinder heads to get the pistons and con rods out though, but most of the action happened on my back under the sump with a torch and a mirror! Best of luck ------------- Chris and Karen - Essex 2011 Stelvio NTX, 1974 950S (750S replica nearly rebuilt!), 1966 Triumph T100SS 59 years young this year! |
 Mike H wrote:
Posted By: Mike H
Date Posted: 15 Jul 2025 at 18:19
Won't forget one baking hot summer and no shade helping my dad remove and strip the gearbox of his car because of, it turned out, the exhaust pipe lightly touching and occasionally vibrating against the transmission tunnel. ------------- "Chicken nuggets don't dance on a Tuesday." |
Posted By: ranton_rambler
Date Posted: 16 Jul 2025 at 19:48
|
I changed the big end shells in my loop with the engine in place. Drop the sump and remove the oil pipe. It’s tight but the caps can be removed. I didn’t take the heads off, just pushed the con rods up a bit. Ian
|
Posted By: Dave P.
Date Posted: 17 Jul 2025 at 17:22
|
I replaced the big end shells on my old V7 Special through the sump. Measuring the crank B/E journals was a bit challenging though. It must have worked OK because that was around 50,000 miles ago. ------------- TO LIVE OUTSIDE THE LAW YOU MUST BE HONEST. 1971 V7 Special. 1972 850GT. 1970 T120 Bonnie. 2009 500 Bullet. |
Posted By: el__burro
Date Posted: 19 Jul 2025 at 12:56
|
Thank you, I'll definitely give it a go once back from holidays. Since con rod shells come different size, is it worth buying them now or better wait. Thanks. el__burro ------------- el__burro |
Posted By: Mike H
Date Posted: 19 Jul 2025 at 17:13
|
First of all be sure it is what you think it is. I remember years ago helping my dad remove and rebuild the gearbox from his car because of a nasty noise. The gearbox was all good - turned out the funny noise was the exhaust pipe lightly touching and vibrating on the transmission tunnel. ------------- "Chicken nuggets don't dance on a Tuesday." |
Posted By: Dave P.
Date Posted: 19 Jul 2025 at 18:01
There's not much point buying shells until you've established what size you need. ------------- TO LIVE OUTSIDE THE LAW YOU MUST BE HONEST. 1971 V7 Special. 1972 850GT. 1970 T120 Bonnie. 2009 500 Bullet. |
Posted By: el__burro
Date Posted: 19 Jul 2025 at 22:27
|
Where would I get the little strips to check "clearance"? Thanks el__burro ------------- el__burro |
Posted By: ranton_rambler
Date Posted: 20 Jul 2025 at 12:54
|
It's called Plastigauge - type it into your preferred search engine and there should be lots of options. There may be other versions by now with different names.
|
Posted By: Dukedesmo
Date Posted: 25 Jul 2025 at 11:47
|
Hard to tell from the video (as my Ducatis sound similar though they're fine) but it does sound a bit 'big-endy'. I had a Ducati 250 Scrambler that started to sound like that, combined with an increased thirst for oil, smoke and power loss until, one day it just died - big ends were shot. As for replacing the big ends, after my LM2 had a piston-to-valve incident, I removed the con rods to check for straightness (they were fine) and for any flat spots on the big end shells so, given I had them out and that they (shells) are cheap enough to treat as consumables, I decided to replace them. As everything looked fine with no real wear (bike had only done 12k miles), I just bought new shells/bolts and fitted them and, 10 years later it's still going strong, but a higher mileage bike and, obviously one where the shells are shot will need measuring/adjusting.
------------- Le Mans 2 Ducati 916 Ducati M900 |
Posted By: Dave P.
Date Posted: 30 Jul 2025 at 17:03
|
Just a thought Mario. Have you checked that your dynamo and its cradle are secure? If the mounting cradle/bracket comes loose the noise can be alarming. ------------- TO LIVE OUTSIDE THE LAW YOU MUST BE HONEST. 1971 V7 Special. 1972 850GT. 1970 T120 Bonnie. 2009 500 Bullet. |
Posted By: el__burro
Date Posted: 23 Aug 2025 at 20:06
|
Hello, holidays over, i am starting this "jobs" My first hurdle is the oil filter assembly (pic 1). I know that the bolts are on the other side but.. do need to remove the cover (pic 2 ) if so how do I remove the pulley bolt, Lastly do I need to remove the engine bolt (pic 2) for the cover to come out? Thank you el__burro   ------------- el__burro |
Posted By: ranton_rambler
Date Posted: 23 Aug 2025 at 20:47
|
If this is a loop engine, there is only a strainer on the pickup, not a filter. I can’t remember the details but I took mine off to change the big-end shells without taking the timing cover off. Ian
|
Posted By: el__burro
Date Posted: 23 Aug 2025 at 22:39
|
Thanks Ian, yes its a loop engine and yes you are correct it's just a strainer but in order to easily reach both con rods bolts, it's holder needs to come off. The only way seems to be from under the belt cover. Thank you. el__burro
------------- el__burro |
Posted By: ranton_rambler
Date Posted: 24 Aug 2025 at 16:59
|
I rotated the engine to bring each bolt into reach. It was very fiddly to get the bolts out and caps off, and probably more so to put it all back together again. But as I said, no need to take front cover off. I think I took the oil pipe off, but that’s easy enough.
|
Posted By: el__burro
Date Posted: 25 Aug 2025 at 12:34
|
Managed to take out the left (easy one) rod. The shellings are in a very sad state. The shaft itself seems fine to me. Now I need to use the plastigage.. and that will be fun. Any tips, suggestions Thanks el__ burro    ------------- el__burro |
Posted By: Simond
Date Posted: 25 Aug 2025 at 13:34
|
My LeMans did something very similar. Horrible pitting of the whitemetal, clunking noise, but the oil light went out as it should. Happily the crank was unscored, and I just rebuilt with standard shells. I also replaced to cam followers, which were also pitted. Reminder to self, change the oil more frequently. Good luck Simon
|
Posted By: Amboman
Date Posted: 25 Aug 2025 at 14:18
|
The sludge trap inside the rod journal is likely full enough that it's restricting oil flow to the rod bearings. ------------- Charlie '69 Ambassador,'71 Ambassador,'73 Eldorado,'75 Eldorado police,'76 Convert,'77 Morini 3 1/2 Strada,'81 Ducati 500SL Pantah http://www.AntietamClassicCycle.com |
Posted By: el__burro
Date Posted: 25 Aug 2025 at 18:36
|
The other set of shells are even worse. I have attempted to use flexigauge to establish what shell size I need to buy but seeing the results, I guess I'm doing it wrong. I know that I should not turn the crankshaft while tightening the bolts but the bloody strainer holder is on the way and I have the results below. All shells are marked with 674 23 000. Thanks el__burro     ------------- el__burro |
Posted By: Mike H
Date Posted: 25 Aug 2025 at 19:55
I am reminded of a member some years ago had a Le Mans - out on a 'bimble' one day, overtook a couple of cars, to be rewarded with a knocking noise. Sludge trap bunged up, big ends only just getting enough lube provided throttle is used only gently. ------------- "Chicken nuggets don't dance on a Tuesday." |
Posted By: el__burro
Date Posted: 25 Aug 2025 at 23:43
Sorry.. where/what is the sludge trap? Thanks el__burro ------------- el__burro |
Posted By: Gianni
Date Posted: 26 Aug 2025 at 08:11
On later engines (those with oil filters and alternators), it is at the front of the crankshaft. You will have to remove the crank (i.e. full engine out job) to get at it. The trap is sealed with a large flush-fitting hex screw which may or may not come out easily. Once out you will find the residual detritus from your big end shells and a thick porridge of 70-year old oil gunk. This must all be thoroughly cleaned out. Whilst you are at it, you should check your main bearing surfaces and the rear cam bearing. I would not be surprised if your cam followers and the cam were not a little worn too. ------------- Le Mans 1, Spada, Cali 1, T3 Mongrel, Le Mans V, Quota x 2, Stelvio TT |
Posted By: c13pep
Date Posted: 26 Aug 2025 at 10:21
|
You’ve now reached decision time ie. is this your winter project or do you loosely reassemble it and recover it to a professional workshop. Looking at the damage I would agree that a full engine refurb will be the most likely outcome for peace of mind. CHRIS ------------- you can`t have any fun in a straight line Honda CB77 project |
Posted By: Mike H
Date Posted: 26 Aug 2025 at 13:00
 I.e. there are no short-cuts, sadly. ------------- "Chicken nuggets don't dance on a Tuesday." |
Posted By: Mike H
Date Posted: 26 Aug 2025 at 13:02
+ Memory is suggesting it's a tapered thread, but memory is unreliable unfortunately. ------------- "Chicken nuggets don't dance on a Tuesday." |
Posted By: Mike H
Date Posted: 26 Aug 2025 at 13:10
|
Detailed info here..... https://www.thisoldtractor.com/moto_guzzi_loopframe_sludge_trap.html" rel="nofollow - https://www.thisoldtractor.com/moto_guzzi_loopframe_sludge_trap.html ------------- "Chicken nuggets don't dance on a Tuesday." |
Posted By: el__burro
Date Posted: 26 Aug 2025 at 16:28
|
OMG, since I need to do the clutch, I guess engine removal is a good way to go.. Too complicated to do anything with engine on. Let's see. el__burro ------------- el__burro |
Posted By: Simond
Date Posted: 26 Aug 2025 at 19:32
|
As I noted above, my shells were similar to el_burro’s. I checked my sludge trap, and a) it wasn’t particularly full of gunk, and b) it wasn’t particularly difficult to unscrew the grubscrew that closes it off. I’ve heard stories of punched threads and Loctite and all sorts, but mine was just tightened. A drop of soft threadlock did make sure it wasn’t coming out again though! With no strong evidence to support my hypothesis, I’m thinking it has more to do with low usage, and consequently infrequent oil changes.
|
Posted By: el__burro
Date Posted: 27 Aug 2025 at 13:17
|
Good afternoon, the numbers on the back of the shells are 67420 000. Probably the "000" means standard size. Any idea? el__burro   ------------- el__burro |
Posted By: el__burro
Date Posted: 28 Aug 2025 at 19:39
|
I have followed the checklist on the manual on how to remove the engine from the frame. All done.. (almost) I have just the 2 main bolt and then.. Where do I disconnect it at the back? Thanks el__burro   ------------- el__burro |
Posted By: ranton_rambler
Date Posted: 29 Aug 2025 at 07:51
|
I have never removed my loop’s engine so I don’t know if there is enough space in the frame to pull it off the clutch splines forwards. My inclination is to take it out with the gearbox as a complete unit. I would think you need to take the back wheel out, and then the swinging arm, plus the battery tray.
|
Posted By: el__burro
Date Posted: 29 Aug 2025 at 19:34
|
Here we go. Engine is off the frame. Still don't get how to remove the big bold holding the pulley and so on.. Thanks el__burro el__burro  ------------- el__burro |
Posted By: Simond
Date Posted: 29 Aug 2025 at 22:16
| Air wrench… |
Posted By: Brian UK
Date Posted: 30 Aug 2025 at 09:41
|
I'd soak it with penetrating oil for 24 hours first. ------------- Brian. Better 5 minutes late in this world than years early in the next. |
Posted By: Chris950s
Date Posted: 30 Aug 2025 at 10:19
|
If you take the gearbox off you can lock the flywheel with a suitably drilled metal bar across the studs, then you can get a good go at the nut. I agree with Brian though, penetrating oil first. ------------- Chris and Karen - Essex 2011 Stelvio NTX, 1974 950S (750S replica nearly rebuilt!), 1966 Triumph T100SS 59 years young this year! |
Posted By: Gianni
Date Posted: 30 Aug 2025 at 13:42
|
Is it a L/H or R/H thread? ------------- Le Mans 1, Spada, Cali 1, T3 Mongrel, Le Mans V, Quota x 2, Stelvio TT |
Posted By: el__burro
Date Posted: 30 Aug 2025 at 14:00
|
Thank you, actually with an impact gun it took 5 seconds. What size is that bolt? I used a 27mm socket. Could not find a 26 anywhere. el__burro ------------- el__burro |
Posted By: Amboman
Date Posted: 01 Sep 2025 at 14:21
|
The nut is 26 mm. ------------- Charlie '69 Ambassador,'71 Ambassador,'73 Eldorado,'75 Eldorado police,'76 Convert,'77 Morini 3 1/2 Strada,'81 Ducati 500SL Pantah http://www.AntietamClassicCycle.com |
Posted By: el__burro
Date Posted: 01 Sep 2025 at 14:39
|
Thanks, I guessed so. Does anyone have an oil pan for sale. Mine got damaged somehow. I have also put a post on the "for sale section but I guess the more.. " Thank you el__burro  ------------- el__burro |
Posted By: el__burro
Date Posted: 01 Sep 2025 at 22:11
|
Another post of this monologue. How do I remove the cog in the image? I guess behind it there are the 2 bolts of the oil strainer.  Thanks el__burro ------------- el__burro |
Posted By: Amboman
Date Posted: 02 Sep 2025 at 14:31
|
There are two threaded holes for a factory type puller, but I simply use a small three-legged puller. Put the nut on the pump shaft to keep from messing up the threads. Tighten down the puller, then strike the end of the puller bolt with a hammer. ------------- Charlie '69 Ambassador,'71 Ambassador,'73 Eldorado,'75 Eldorado police,'76 Convert,'77 Morini 3 1/2 Strada,'81 Ducati 500SL Pantah http://www.AntietamClassicCycle.com |
Posted By: el__burro
Date Posted: 02 Sep 2025 at 16:31
|
Thanks. I'll "have to make a puller. Regatds el__burro ------------- el__burro |
Posted By: el__burro
Date Posted: 04 Sep 2025 at 18:54
|
After removing the oil pump and friends, I have managed to get a better shot at using Plastigage. I'm not sure what the actual size shells are. The code on them is 764 20 000. The last 3 zeros probably suggest "standard size(?)" Next, remove the crankshaft. Thanks el__burro    ------------- el__burro |
Posted By: el__burro
Date Posted: 07 Sep 2025 at 02:05
|
have managed to remove and clean the crankshaft, it was quite clogged. Next is to refit the new camshaft plug but it won't fit in the hole. Surely some JB weld would help. Thank you el__burro    ------------- el__burro |
Posted By: Amboman
Date Posted: 07 Sep 2025 at 14:28
|
Why did you remove the old one? ------------- Charlie '69 Ambassador,'71 Ambassador,'73 Eldorado,'75 Eldorado police,'76 Convert,'77 Morini 3 1/2 Strada,'81 Ducati 500SL Pantah http://www.AntietamClassicCycle.com |
Posted By: el__burro
Date Posted: 07 Sep 2025 at 20:03
|
Hello, I think it was leaking Thanks el__burro ------------- el__burro |
Posted By: el__burro
Date Posted: 08 Sep 2025 at 00:13
|
I really don't understand what size shells i need to buy. Below are some of the plastigage reading Any idea Thanks el__burro   ------------- el__burro |
Posted By: el__burro
Date Posted: 11 Sep 2025 at 11:19
|
I guess, it's only me and myself and I, here. I filed the cap a bit and JBWelded it, hopefully, it won't leak. I'll test it in a few days. Next, order the shells, I'll probably go for standard size. Thank you el__burro    ------------- el__burro |
Posted By: Dukedesmo
Date Posted: 11 Sep 2025 at 12:17
|
I'm a big fan of JB Weld, I'm currently using large quantities of the stuff on my Land Rover bodywork repairs, sticking new aluminium panels together, filling holes in the roof etc. and it is good stuff but, it is quite brittle and I'm not certain how it holds up in a hot/oily environment? You don't want it breaking down inside the engine, could cause more damage than you're repairing if chunks of it get in your oilways. I'm not saying it will as I don't know, just thinking out loud here. ------------- Le Mans 2 Ducati 916 Ducati M900 |
Posted By: Amboman
Date Posted: 11 Sep 2025 at 14:30
|
Why not measure the journal with a micrometer so that you'll get the correct sized shells? The cam plug is similar to a "freeze plug" and is expanded into place. Google "how to install a freeze plug". Sealer is recommended, but I wouldn't rely solely on JB Weld to do hold it into place. ------------- Charlie '69 Ambassador,'71 Ambassador,'73 Eldorado,'75 Eldorado police,'76 Convert,'77 Morini 3 1/2 Strada,'81 Ducati 500SL Pantah http://www.AntietamClassicCycle.com |
Posted By: el__burro
Date Posted: 11 Oct 2025 at 12:03
|
Hello, after a while I am reassembling the engine. My first issue is with the flange, Removal was very easy, not much pulling required. I know that to sit it in, it requires some bolts to call it in. Not in my case. I have tried a different one but it has the same issue. The video below shows how easily it fits. The seal are standard size and the crankshaft (beside the center journal) has NOT been machined. I am not sure if this will be a problem if left as it is.. The other issue is that if I thighten the big end to specs 31nm approx the shaft doesn't turn. Any idea? Thanks el__burro http://youtube.com/shorts/c5oTAn7t6zE?si=BXKxvfk3p70zaenPyoutube.com/shorts/c5oTAn7t6zE?si=BXKxvfk3p70zaenP" rel="nofollow - http://youtube.com/shorts/c5oTAn7t6zE?si=BXKxvfk3p70zaenP
------------- el__burro |
Posted By: Mike H
Date Posted: 12 Oct 2025 at 19:38
|
Flange - maybe I'm being thick but I can't see what the problem is and I've watched the video several times, what I did notice is the seal seems slightly crooked? Big end - do you mean at the bottom of the con-rods? If you mean what I think you mean then the big end shells are too tight? No this is not good... ------------- "Chicken nuggets don't dance on a Tuesday." |
Posted By: el__burro
Date Posted: 12 Oct 2025 at 23:40
|
Hello, the flange slides in without the need to use the bolts. (as seen in several videos) The seal is new and to me, it looks good. I had the journal machined, the mechanic suggested I'd go one undersize, so I did. Could it be that the torque setting differs with the shells size??? I don't have a clue Thanks for your suggestions. el__burro
------------- el__burro |
Posted By: Dave P.
Date Posted: 13 Oct 2025 at 17:23
|
No, the torque setting should be the same regardless of shell size.So you have had the big end journals machined. What undersize have you now, 1st, 2nd or ?? Are you sure that the shells you have fitted are the correct ones for your re-ground crank? It sounds to me that the re-grind and the shells are a missmatch. Big end bolt/nut torque is 33/35 foot pounds according to Greg Bender.Not 31 NM as you have said. ------------- TO LIVE OUTSIDE THE LAW YOU MUST BE HONEST. 1971 V7 Special. 1972 850GT. 1970 T120 Bonnie. 2009 500 Bullet. |
Posted By: el__burro
Date Posted: 13 Oct 2025 at 20:42
|
Thanks Dave, actually the shells are 1st undersize. The person who did the job did all the measurements. Looked at the shells size available and suggested to go for 1st undersize. I will remove it all and double check the size. I am aware that the settings is 45nm but 30 is as far as I can go before they lock. What about the flange? Thanks el__burro
------------- el__burro |
Posted By: Dave P.
Date Posted: 14 Oct 2025 at 10:33
I don't know about the bearing carrier.I've only had one out once and it was a tight fit, sorry.  ------------- TO LIVE OUTSIDE THE LAW YOU MUST BE HONEST. 1971 V7 Special. 1972 850GT. 1970 T120 Bonnie. 2009 500 Bullet. |
Posted By: Amboman
Date Posted: 14 Oct 2025 at 14:23
|
33-35 ft. lbs is correct for the self-locking type of rod nuts, but the earlier type with a locking tab are only torqued to 25 ft. lbs. (25.31 is the spec.). ------------- Charlie '69 Ambassador,'71 Ambassador,'73 Eldorado,'75 Eldorado police,'76 Convert,'77 Morini 3 1/2 Strada,'81 Ducati 500SL Pantah http://www.AntietamClassicCycle.com |
Posted By: el__burro
Date Posted: 14 Oct 2025 at 15:18
|
Thank you Amboman, yes the bolts have the locking tabs on them. I'll tighten to 25.31 ft lbs and see what happens. Thank you, that's a good news.  el__burro ------------- el__burro |
Posted By: Mike H
Date Posted: 18 Oct 2025 at 16:35
|
Sorry to be a bucket of cold water, bur this sounds completely wrong. A proper professional machine shop rebuilding an engine would grind the crank to fit the new undersized shells, which they will probably get hold of first, then do a test assembly of the bigends using say plastigauge to check the running clearance, aka gap. It will be quite specific and very few thousands of an inch. Having someone else modifiy the crank and then you trying to do the clearance test fitting seems very hit and miss, because it's not all 'in house'. You need to know exactly what the crankpin diameter needs to be for the shells you've got, minus of course what the running clearance has to be, then you can go back to your machinist man and be able to tell him what the final crankpin diameter has to be. Still don't understand what you problem with the flange is, you keep mentioning it but not saying what the actual problem is.  ------------- "Chicken nuggets don't dance on a Tuesday." |
Posted By: el__burro
Date Posted: 19 Oct 2025 at 17:00
|
Thanks for your reply. Regarding the flange "problem" please see the video in a previous reply. The flange slides in without being pulled by the 2 bolts. Regarding the crankshaft issue, Iam going back tomorrow with the crankshaft, conrods and shells, hopefully they won't ask me £120 more to sort this out. The pics below show the set tightened by fingers. No free movement. Thanks el__burro    ------------- el__burro |
Posted By: c13pep
Date Posted: 19 Oct 2025 at 18:17
|
both shells show `odd` wear patterns despite only being test fitted, engineers blue will give a better clue CHRIS ------------- you can`t have any fun in a straight line Honda CB77 project |
Posted By: el__burro
Date Posted: 26 Oct 2025 at 17:02
|
Good evening everyone, One update and a quick question. The con rod have been filed a bit and now fit perfectly. My question is, would the scratch in the flange case (now filed down) cause any issue? Thanks el__burro 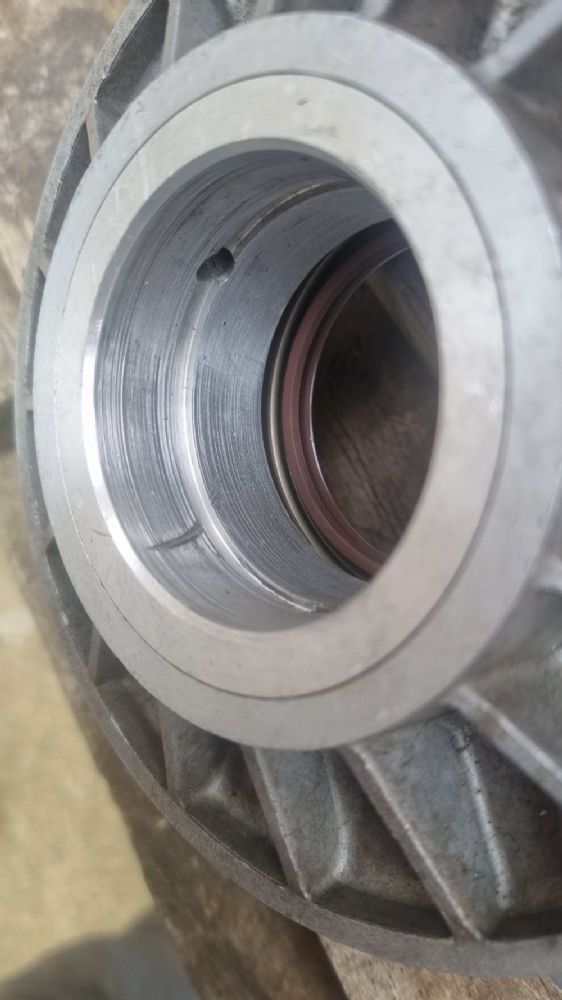  ------------- el__burro |
Posted By: Mike H
Date Posted: 04 Nov 2025 at 20:34
Oh I see - well I'd rather hoped it would, have never done one though. Could be wrong but I thought the 'bolt pulling' was involved getting it off and breaking the gasket seal.  ------------- "Chicken nuggets don't dance on a Tuesday." |